How to Build DIY Large Planters for Outdoors — Easy Step-by-Step Guide
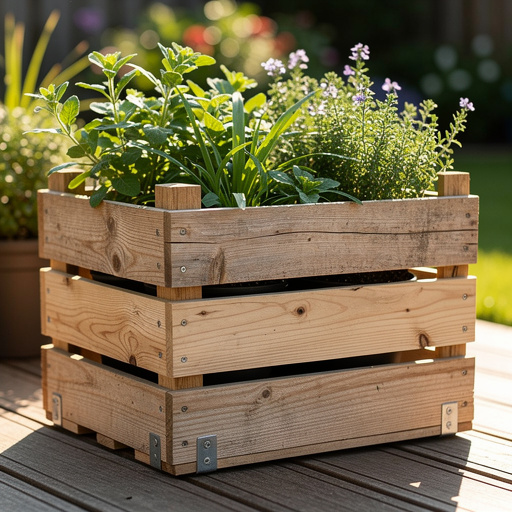
Create beautiful and functional large planters for your garden using simple wooden crates. This screen-free project is perfect for families looking to add a touch of nature. Easy to build and customize, these planters will elevate your outdoor space and provide a wonderful home for your favorite plants.
Quick answer
To make DIY large planters for outdoors, you need sturdy wooden crates, landscape fabric, wood screws, a staple gun, and sandpaper, taking about 60 minutes. Start by inspecting and reinforcing the crates, then sand and optionally seal them. Line the inside with landscape fabric, securing it with staples. This beginner-friendly activity has 10 steps and is perfect for families.
What you need
Shop on Amazon · As an Amazon Associate we earn from qualifying purchases. Links above are affiliate links — we may earn a commission at no extra cost to you.
Transform your garden, patio, or balcony into a lush oasis with these charming DIY large planters crafted from simple wooden crates. This project is a fantastic way to upcycle materials and add a rustic, natural touch to your outdoor living space. It's an ideal activity for families seeking a screen-free way to connect with nature and get creative together. With minimal tools and straightforward steps, you'll be enjoying your beautiful, custom planters in no time, ready to be filled with vibrant flowers, herbs, or vegetables.
On this page
Step-by-Step Instructions
- 1
**Inspect and Reinforce Crates:** Begin by thoroughly inspecting each wooden crate for any loose boards, protruding nails, or splintered areas. Gently push on the sides and bottom to check for stability; if any sections feel wobbly, reinforce them by driving a few extra wood screws through the adjoining boards, ensuring a solid and secure structure for your planter.
- 2
**Smooth Rough Edges:** Put on your safety glasses and work gloves. Using medium-grit sandpaper, lightly sand the exterior surfaces of the crates, paying special attention to any rough patches, splinters, or sharp edges. This step not only makes the planter safer to handle but also prepares the wood for a smoother finish if you choose to paint or seal it.
- 3
**Apply Protective Finish (Optional):** If you desire to protect your planters from the elements and prolong their lifespan, now is the time to apply a wood sealant or exterior paint. Choose a product specifically designed for outdoor use and follow the manufacturer's instructions for application and drying times, ensuring complete coverage for maximum protection.
- 4
**Prepare for Lining:** Turn each crate upside down so that the open top is facing downwards on your work surface. This orientation makes it easier to access the interior for lining and ensures the fabric will drape correctly.
- 5
**Cut Landscape Fabric:** Measure the interior dimensions of one crate. Cut a piece of landscape fabric that is large enough to line the entire inside, including the bottom and all four sides, with at least 6-8 inches of excess fabric extending beyond the top edges. This extra fabric will be folded over to create a neat and secure finish.
- 6
**Position Landscape Fabric:** Carefully place the cut landscape fabric inside the inverted crate, pressing it firmly into all the corners and ensuring it conforms to the shape of the crate's interior. Smooth out any wrinkles or bulges to create a snug fit against the wood.
- 7
**Fold and Secure Fabric Edges:** Once the fabric is in place, begin folding the excess landscape fabric over the top edges of the crate, creating a clean hem. Aim for a neat fold that will be hidden once the planter is filled with soil.
- 8
**Staple Fabric to Crate:** Using your heavy-duty staple gun, begin to securely attach the folded landscape fabric to the inside edges of the crate. Place staples every 2-3 inches, ensuring the fabric is taut and forms a continuous barrier that will hold soil while allowing water to drain.
- 9
**Complete Interior Lining:** Continue stapling the landscape fabric all the way around the inside perimeter of the crate, ensuring there are no gaps where soil could escape. Pay attention to the corners, making sure the fabric is pulled taut and stapled securely to prevent sagging.
- 10
**Repeat for All Crates:** Repeat steps 4 through 9 for each of your wooden crates, ensuring that every planter is fully lined with landscape fabric. This thorough lining is crucial for the longevity of your planters and the health of your plants.
- 11
**Add Drainage Holes (If Necessary):** While landscape fabric allows for drainage, if your crate has a solid bottom or very small gaps, consider drilling a few extra 1/4-inch drainage holes through the bottom of the crate and the fabric. This will further enhance water flow and prevent waterlogging.
- 12
**Reinforce Bottom (Optional):** For extra support, especially if you plan to plant heavy items or move the planters frequently, you can staple a second layer of landscape fabric to the bottom interior of the crate. Alternatively, if your crate slats are very wide, consider adding a layer of chicken wire or hardware cloth beneath the landscape fabric before stapling to prevent soil from falling through.
- 13
**Final Inspection:** Before turning your planters right side up, give them a final once-over. Check that all staples are securely in place, the fabric is taut, and there are no loose boards or sharp edges that could pose a hazard.
- 14
**Turn Planters Upright:** Carefully turn each completed planter right side up. Admire your handiwork – your DIY large planters are now ready to be filled with your favorite soil mix and plants!
- 15
**Position Your Planters:** Choose the perfect location for your new planters, considering sunlight requirements for your chosen plants and how they will enhance your outdoor aesthetic. Arrange them individually or group them together for a more impactful display.
- 16
**Fill with Soil:** Begin filling your planters with a high-quality potting mix. Avoid using heavy garden soil, which can compact too easily in containers. Gently pack the soil around the roots of your plants as you add them.
- 17
**Planting Time:** Now for the fun part! Carefully plant your chosen flowers, herbs, vegetables, or small shrubs into the soil. Ensure you give each plant adequate space to grow and thrive.
- 18
**Water Thoroughly:** After planting, water your new planters thoroughly until water begins to drain from the bottom. This helps settle the soil and hydrate the plants.
- 19
**Ongoing Care:** Regularly monitor your plants for watering needs, fertilizing, and any signs of pests or diseases. Your beautiful DIY planters will provide a wonderful home for your greenery throughout the season.
Tips & Troubleshooting
- 1If your crates have large gaps between the slats, you can add a layer of chicken wire or hardware cloth inside the landscape fabric for extra support and to prevent soil from falling out. This is especially useful for crates with very wide openings, ensuring your soil stays contained while still allowing for adequate drainage.
- 2For added durability and to prevent rot, consider using exterior-grade wood sealant or paint on the outside of your planters, especially if they will be exposed to the elements year-round. This protective coating will significantly extend the life of your wooden crates and keep them looking their best.
- 3You can stack multiple crates to create tiered planters or arrange them in different configurations to suit your outdoor space. Experiment with different heights and groupings to create a dynamic and visually appealing garden display that maximizes your available area.
- 4Ensure the landscape fabric has small holes or is permeable to allow excess water to drain, preventing waterlogged soil and root rot. Most standard landscape fabrics are designed for this purpose, but always check the product description to confirm its drainage capabilities.
- 5To make your planters mobile, consider attaching heavy-duty casters to the bottom of the crates before filling them with soil. This will allow you to easily rearrange your garden layout or move the planters to a more sheltered location during harsh weather.
- 6Personalize your planters by painting them in vibrant colors or applying decorative stencils. This is a great opportunity to inject your personal style into your garden design and create a truly unique focal point.
- 7When selecting plants, consider the size of your crates and the mature size of the plants. Opt for plants that are well-suited to container gardening and have similar watering and sunlight needs if planting multiple varieties together.
- 8For very large or heavy planters, consider reinforcing the bottom with an extra layer of wood or plywood before adding the landscape fabric. This will provide additional structural integrity and prevent the bottom from bowing under the weight of the soil and plants.
Related Activities You Might Enjoy
Frequently Asked Questions
What kind of wood is best for outdoor planters?
For outdoor planters, opt for rot-resistant woods like cedar, redwood, or cypress, as these natural materials are inherently durable and can withstand moisture and insect damage. If using standard lumber like pine or fir, it's crucial to ensure it's pressure-treated for outdoor use or thoroughly sealed and painted with an exterior-grade product. This protective barrier will significantly extend the lifespan of your planters by preventing rot and decay caused by constant exposure to the elements, ensuring your beautiful creations can be enjoyed for many seasons to come.
How do I ensure my DIY large planters have good drainage?
Good drainage is crucial for the health of your plants and is easily achieved with these DIY planters. The landscape fabric you use is permeable, allowing excess water to escape, but it's also important to ensure there are no blockages at the bottom. If your crates have solid bottoms, drill a few 1/4-inch drainage holes through the wood and fabric. Additionally, avoid placing the planters directly on solid surfaces that could impede water flow; elevating them slightly on small blocks or casters can further enhance drainage and prevent waterlogged soil, which is a common cause of root rot.
Can I make these planters without a drill?
While a drill makes screwing boards together and adding drainage holes significantly easier and more secure, you could potentially assemble and reinforce these planters without one. For initial crate assembly, if needed, strong wood glue and robust clamps could be used, though screws offer superior structural integrity for large planters that will hold significant weight. For securing the landscape fabric, a heavy-duty staple gun is essential, and this tool doesn't require a drill. If you absolutely cannot use a drill for drainage holes, you might be able to carefully pierce them with a sharp awl or even a heated metal skewer, but a drill is highly recommended for best results and safety.
What plants are suitable for large outdoor planters?
Large planters are ideal for a variety of plants, offering ample root space for robust growth. You can successfully grow vegetables like tomatoes, peppers, cucumbers, and bush beans, which benefit from the depth and stability. Flowering shrubs, small ornamental trees, and even dwarf fruit trees can thrive in these spacious containers. For a more immediate impact, fill them with a mix of colorful annuals, perennials, and trailing plants to create stunning visual displays. Always choose plants based on your climate, the amount of sunlight your planter location receives, and the mature size of the plant to ensure success.
How long will these wooden crate planters last outdoors?
The lifespan of your wooden crate planters will largely depend on the type of wood used, the climate they are exposed to, and the protective measures you take. Unfinished, untreated crates made from softer woods might only last one to two seasons. However, by using rot-resistant wood like cedar or redwood, or by thoroughly sealing and painting standard lumber with exterior-grade products, you can expect your planters to last anywhere from 3 to 7 years, or even longer. Regular maintenance, such as reapplication of sealant and ensuring good drainage, will further contribute to their longevity.
Can I use these planters for edible plants like herbs and vegetables?
Absolutely! These large wooden crate planters are perfect for growing edible plants like herbs and vegetables. Ensure that if you are using treated lumber, it is rated for ground contact and safe for growing food, or opt for untreated wood and seal it with a food-safe sealant. The ample space provided by the crates allows for healthy root development, which is essential for productive vegetable and herb gardens. Just be sure to use a good quality potting mix and provide adequate sunlight and water for your chosen edibles.
What Next?
Congratulations on building your own beautiful and functional large wooden crate planters! These versatile creations can be arranged in countless ways to suit your aesthetic and space, from a linear display along a fence to a tiered arrangement for added visual interest. Consider adding casters to the bottom for easy mobility, or even painting them in bold colors to make a statement. As your plants grow, these planters will become a cherished part of your outdoor sanctuary. For your next project, explore building matching garden benches or trellises to complement your new planters.
Free: 10 Paper Crafts Anyone Can Make in 5 Minutes
Get our beginner guide + new craft ideas weekly.
No spam. Unsubscribe anytime.
Did you complete this activity?
Related