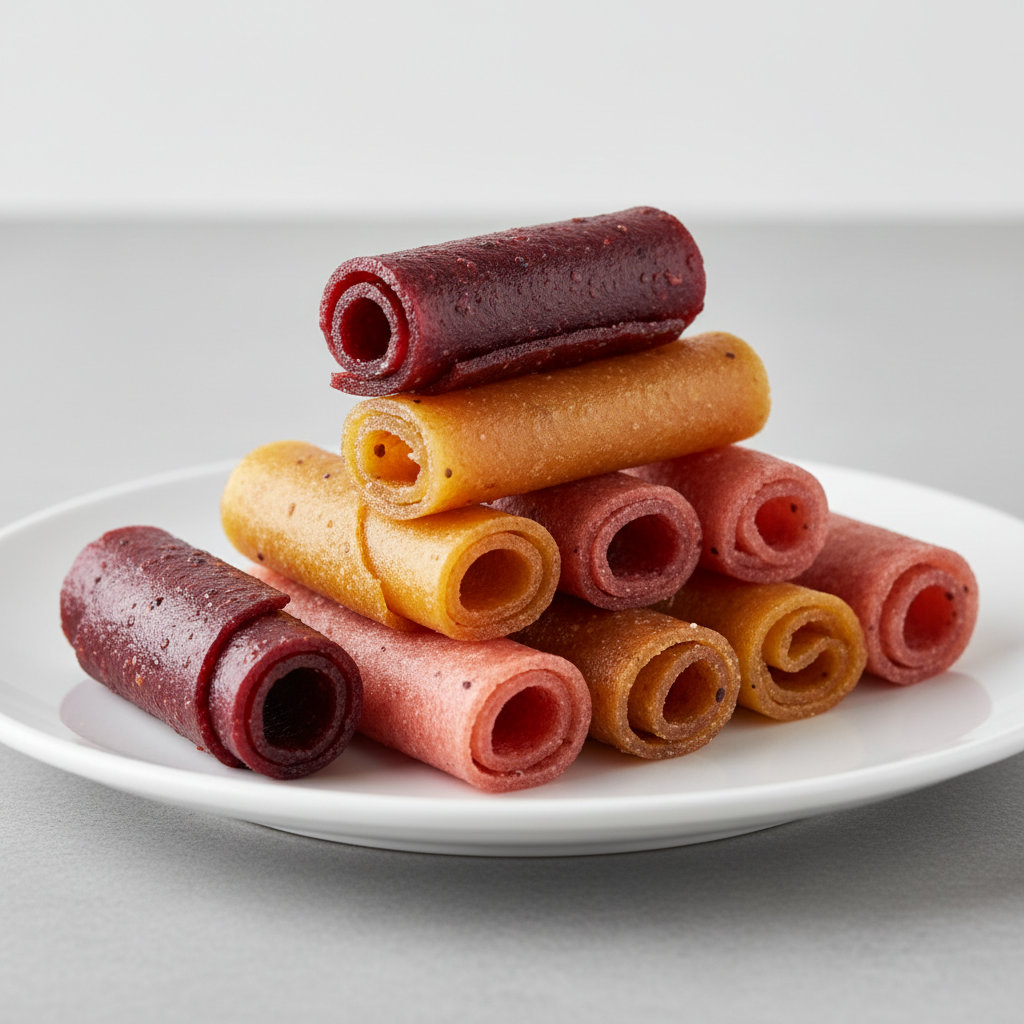
DIY Fruit Roll-Ups: A Healthy and Delicious Homemade Treat
Whip up a batch of homemade fruit roll-ups using your favorite fruits. This recipe is simple, customizable, and a fantastic way to enjoy a healthy snack.
Quick answer
Homemade fruit roll-ups are made by pureeing fruit, cooking it down to a thick consistency, spreading it thinly on a baking sheet, and baking at a low temperature until dry and leathery. They are then rolled and cut into individual servings.
What you need
Shop on Amazon · As an Amazon Associate we earn from qualifying purchases. Links above are affiliate links — we may earn a commission at no extra cost to you.
Tired of store-bought fruit snacks loaded with artificial ingredients and excessive sugar? Embark on a delightful culinary adventure with this DIY Fruit Roll-Ups recipe! Crafting your own fruit leathers is not only incredibly rewarding but also a fantastic way to control the ingredients and tailor the flavors to your family's preferences. This project is perfect for parents seeking healthier alternatives for lunchboxes, a fun activity to do with kids, or for anyone who simply loves the sweet, chewy goodness of fruit. Get ready to transform simple fruits into a vibrant, delicious, and guilt-free treat!
On this page
Step-by-Step Instructions
- 1
Preheat your oven to 200 degrees Fahrenheit (93 degrees Celsius). This low temperature is crucial for dehydrating the fruit without cooking it, preserving its nutrients and flavor.
- 2
Prepare your fruit: Wash, peel, and chop your chosen fruits into manageable pieces. For fruits like berries, ensure they are thoroughly washed and any stems are removed. For tougher fruits like mango, remove the skin and pit before cubing.
- 3
Blend each type of fruit separately in a blender or food processor until it forms a smooth puree. Aim for a consistency similar to applesauce, ensuring there are no large chunks remaining. Rinse the blender thoroughly between each fruit to prevent flavor mixing, especially if you are making multiple varieties.
- 4
For an extra smooth texture, you can optionally pass each fruit puree through a fine-mesh sieve. This step removes any seeds or fibrous bits, resulting in a more refined fruit leather. Gently press the puree through with a spatula.
- 5
Transfer each fruit puree into its own small saucepan. Using separate saucepans for each fruit ensures that the flavors remain distinct and that each batch cooks evenly.
- 6
Sweeten the purees: For each cup of fruit puree, stir in 1/3 cup of granulated sugar. You can adjust this amount based on the natural sweetness of your fruit and your personal preference. For a triple batch of one fruit, you can add a full cup of sugar to that single puree. Consider adding 1 tablespoon of lemon juice per cup of puree at this stage to brighten the flavors and act as a natural preservative.
- 7
Cook the purees: Place the saucepans over medium-high heat and bring the purees to a gentle simmer. Stir the mixture frequently to prevent scorching on the bottom of the pan.
- 8
Thicken the purees: Continue to simmer the purees, stirring occasionally and reducing the heat to medium-low if necessary, until they lose their liquid consistency and become thick and tacky. This process concentrates the fruit sugars and removes excess moisture, which is essential for creating a leathery texture. This thickening process typically takes about 10-15 minutes for softer fruits like bananas and around 30-45 minutes for fruits with higher water content like grapes and strawberries. The puree should be thick enough to coat the back of a spoon without dripping off immediately.
- 9
Prepare for baking: Once thickened, remove the saucepans from the heat. Line a rimmed baking sheet with either greased aluminum foil or a silicone baking mat. Ensure the lining covers the entire surface of the baking sheet to prevent sticking. Pour each fruit puree onto its prepared baking sheet, keeping different flavors separate if desired.
- 10
Spread thinly: Using an offset spatula or the back of a spoon, spread each fruit puree out into a thin, even layer, aiming to create a rectangular shape. The thinner the layer, the faster and more evenly it will dry. Aim for a thickness of about 1/8 to 1/4 inch.
- 11
Bake until dry: Place the baking sheets in the preheated oven and bake for approximately 3 hours, or until the fruit leather is no longer tacky to the touch. The exact baking time will vary depending on the thickness of your fruit layer and the humidity in your oven. You should be able to touch the surface without any sticking.
- 12
Check for doneness: Periodically check the fruit leather by gently touching its surface. If it's still sticky, continue baking. If it starts to brown excessively, you may need to reduce the oven temperature slightly or cover it loosely with foil.
- 13
Cool and remove: Carefully remove the baking sheets from the oven. Allow the fruit leather to cool on the baking sheet for about 10-15 minutes. This cooling period helps it firm up slightly, making it easier to handle. Gently turn out each fruit leather onto a piece of wax paper or parchment paper.
- 14
Peel off the lining: Carefully peel away the parchment paper or silicone mat from the back of the fruit leather. If you used greased aluminum foil, ensure it peels off cleanly without tearing the fruit leather.
- 15
Roll the leather: Tightly roll each fruit leather into a log, starting from one end. Rolling it while it's still slightly warm and pliable makes it easier to achieve a neat, compact roll.
- 16
Cut into roll-ups: Once rolled, use a sharp knife or kitchen scissors to cut the logs into desired roll-up sizes. You can cut them into bite-sized pieces or longer strips, just like the store-bought versions.
- 17
Store properly: Arrange the finished fruit roll-ups in an airtight container, separating layers with wax paper or parchment paper to prevent sticking. Store the finished fruit roll-ups in an airtight container for up to 5 days at room temperature, or in the refrigerator for longer shelf life.
Tips & Troubleshooting
- 1Experiment with fruit combinations to create unique flavor profiles. For example, try mixing sweet mango with tart raspberries, or banana with a hint of cinnamon for a classic flavor. The possibilities are truly endless, and you can even incorporate a small amount of pureed vegetables like carrots or sweet potato for added nutrients.
- 2Don't over-sweeten your fruit purees, especially if you are using naturally sweet fruits like ripe mangoes or bananas. The cooking process will concentrate the natural sugars, so start with less sugar and taste as you go. You can always add a touch more if needed, but you can't take it away.
- 3Ensure your fruit puree is cooked down sufficiently before baking. If it's too watery, it will take significantly longer to dry and may result in a sticky final product. The consistency should be thick and jam-like, with minimal liquid separation.
- 4Spreading the fruit puree thinly and evenly is key to achieving a good texture and even drying. Use an offset spatula or the back of a spoon to ensure a consistent thickness across the entire baking sheet. Uneven layers will lead to some parts being overcooked and others undercooked.
- 5Keep a close eye on your fruit roll-ups during the last hour of baking. Ovens can vary, and it's easy for the edges to become too dark or brittle if left unattended. If you notice uneven drying, you can rotate the baking sheets or even remove sections that are done earlier.
- 6For a truly smooth and seedless fruit leather, consider using a food mill or a very fine-mesh sieve after pureeing your fruit. This step is particularly beneficial for fruits with small seeds like strawberries or raspberries, ensuring a pleasant eating experience.
- 7If your fruit leather is still a little tacky after the recommended baking time, you can try turning off the oven and leaving the fruit leather inside with the door slightly ajar. This allows it to continue drying gently without the risk of over-browning.
- 8To prevent sticking when rolling, ensure the fruit leather is cooled enough to handle but still pliable. If it becomes too stiff, gently warm it for a few minutes in the turned-off oven. Rolling it tightly will help create a uniform log that is easy to slice.
Related Activities You Might Enjoy
Frequently Asked Questions
Can I make fruit roll-ups without adding sugar?
Absolutely! If you're aiming for a sugar-free treat, you can omit the added sugar entirely, especially if you're using naturally sweet fruits like ripe mangoes, bananas, or very sweet berries. The natural sugars in the fruit will caramelize during the cooking and baking process, providing sweetness. However, be aware that without added sugar, the fruit leather might have a slightly more tart flavor and a less chewy texture. You might also find that it dries out a bit faster. If you find the flavor too tart, you can experiment with natural sweeteners like a small amount of honey or maple syrup, though these will still add sugars. For a truly sugar-free option, focus on using the sweetest fruits available and ensure they are fully ripe.
What are the best fruits to use for homemade fruit roll-ups?
The best fruits for homemade fruit roll-ups are those that have a good balance of sweetness and pectin, which helps them thicken and set. Excellent choices include berries (strawberries, raspberries, blueberries), mangoes, peaches, apricots, plums, and bananas. Apples and pears also work well, especially when combined with spices like cinnamon. Fruits with high water content, like watermelon or grapes, can be used but may require longer cooking and drying times. It's also a great way to use up slightly overripe fruit, as their sweetness is more concentrated. Mixing different fruits can create complex and delicious flavor combinations, so don't be afraid to experiment!
How long do homemade fruit roll-ups last?
When stored properly in an airtight container at room temperature, homemade fruit roll-ups can last for up to 5 days. For longer shelf life, it's best to store them in the refrigerator, where they can remain fresh for up to 2-3 weeks. Ensure that they are completely cooled before storing and that the container is truly airtight to prevent them from drying out or absorbing moisture from the air. If you notice any signs of mold or an off smell, it's best to discard them. Properly dried and stored fruit leathers are quite shelf-stable due to their low moisture content, but homemade versions may not have the same preservatives as commercial ones.
Why are my fruit roll-ups sticky after baking?
If your fruit roll-ups are still sticky after baking, it usually means they haven't been dried out sufficiently. This can be due to several factors: the fruit puree was too thick to begin with, the baking temperature was too high causing the outside to dry before the inside, or the baking time was simply not long enough. To fix this, you can return the fruit roll-ups to the oven at the same low temperature (200°F or 93°C) and continue baking, checking them every 30 minutes. You can also try turning off the oven and leaving the fruit roll-ups inside with the oven door slightly ajar to allow them to air dry further. Ensure your fruit puree was cooked down to a thick, jam-like consistency before spreading.
Can I use a dehydrator instead of an oven for making fruit roll-ups?
Yes, a food dehydrator is an excellent alternative to using an oven for making fruit roll-ups, and many people find it to be more efficient and consistent. If you have a dehydrator, you'll typically use fruit leather trays or line your regular dehydrator trays with parchment paper or silicone mats. Set your dehydrator to around 135°F (57°C) and follow the same steps for preparing and spreading the fruit puree. The drying time will vary depending on your dehydrator model and the thickness of your fruit layer, but it can often be faster than oven drying, typically taking 6-12 hours. This method also uses less energy than keeping an oven on for several hours.
How can I make my fruit roll-ups healthier?
To make your fruit roll-ups even healthier, focus on using a variety of whole fruits and minimizing added sugars. Opt for naturally sweet fruits and rely on their inherent sweetness. If you do add sugar, consider using less than the recipe suggests or using natural sweeteners like a small amount of honey or maple syrup sparingly. You can also boost the nutritional content by adding ingredients like chia seeds, flax seeds, or a small amount of pureed vegetables such as carrots or sweet potatoes to the fruit puree. These additions can provide extra fiber, omega-3 fatty acids, and vitamins without significantly altering the flavor. Ensure you're using fresh, high-quality fruits for the best flavor and nutrient profile.
What Next?
Congratulations on creating your own vibrant and delicious fruit roll-ups! Experiment with different fruit combinations, like apple-cinnamon or pineapple-mango, for endless flavor possibilities. For an extra special touch, consider adding a sprinkle of chia seeds or a hint of vanilla extract to your puree before cooking. These homemade treasures are perfect for packing in lunchboxes, enjoying as an after-school snack, or even serving as a healthy dessert. Store them in an airtight container at room temperature for up to 5 days, or in the refrigerator for longer shelf life. Once you've mastered this basic recipe, you might want to explore other dehydrating projects, like making dried apple rings or vegetable chips!
Free: 10 Paper Crafts Anyone Can Make in 5 Minutes
Get our beginner guide + new craft ideas weekly.
No spam. Unsubscribe anytime.
Did you complete this activity?
Related
You might also like
3-Ingredient Peanut Butter Puffs
3-Ingredient Peanut Butter Drops
3-Ingredient Peanut Butter Delights

Speedy 3-Ingredient Cookies
5-Ingredient Peanut Butter Drops