How to Make 5-Minute No-Bake Yogurt Parfait Stacks — Easy Step-by-Step Guide
Create beautiful and delicious no-bake yogurt parfait stacks in just minutes! A fun and healthy dessert or snack that kids can help assemble.

Quick answer
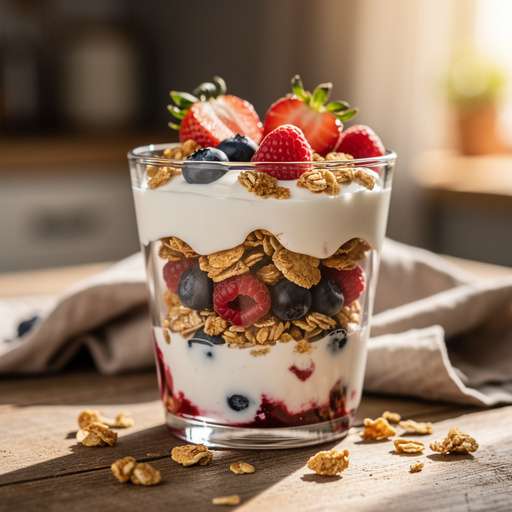
To make 5-minute no-bake yogurt parfait stacks, you need yogurt, granola, and fruit, taking about 5 minutes. Start by layering ingredients in a glass. This beginner-friendly activity has 6 steps and is perfect for families with kids aged 4+.
What you need
Shop on Amazon · As an Amazon Associate we earn from qualifying purchases. Links above are affiliate links — we may earn a commission at no extra cost to you.
Looking for a quick, healthy, and visually appealing treat that requires zero oven time? These 5-minute no-bake yogurt parfait stacks are your answer! Perfect for busy weeknights, a fun weekend activity with kids, or a light and satisfying dessert, these parfaits are incredibly versatile. Their simple assembly makes them an ideal project for even the youngest chefs, fostering independence and a love for healthy eating. Get ready to impress yourself and your family with this effortlessly elegant creation!
On this page
Step-by-Step Instructions
- 1
Gather all your ingredients and clear a clean workspace. Ensure your glasses are clean and dry, and that your fruits are washed and prepped if using fresh. Having everything ready before you start will make the assembly process smooth and efficient, especially if you have little helpers eager to jump in.
- 2
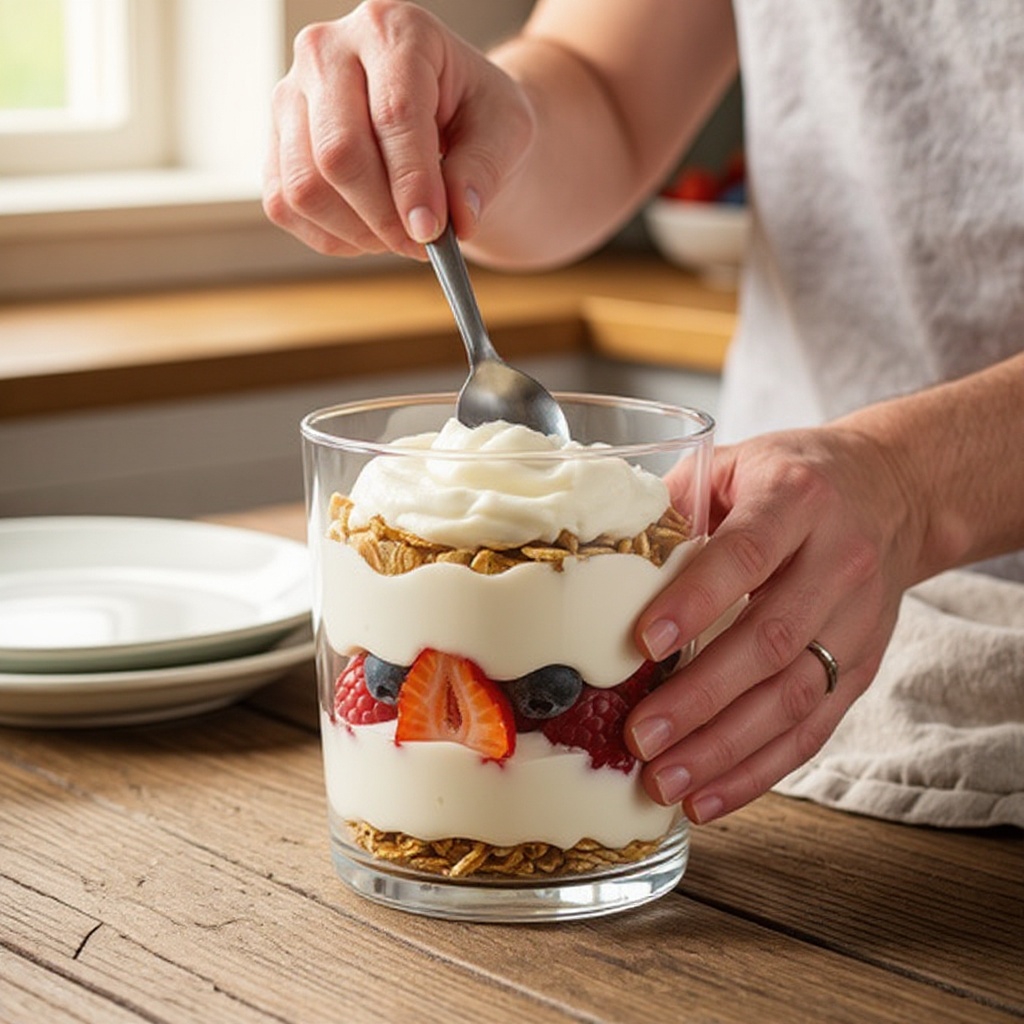
Begin by spooning approximately 2 tablespoons of Greek yogurt into the bottom of one of your clear glasses. Use the back of the spoon to gently spread it into an even layer, creating a stable base for the subsequent ingredients. Avoid pressing down too hard, as this can make it difficult to layer subsequent ingredients neatly.
- 3
Next, carefully sprinkle about 1 tablespoon of your chosen granola over the yogurt layer. Distribute it evenly to ensure a good crunch in every bite. If your granola is in large clusters, you might want to gently break it up slightly before sprinkling to achieve a more uniform distribution.
- 4
Add approximately 1 tablespoon of mixed berries on top of the granola layer. If using larger berries like strawberries, consider slicing them into bite-sized pieces for easier eating and a more aesthetically pleasing arrangement. Ensure the berries are spread out to cover the granola as much as possible.
- 5
Now, repeat the layering process. Spoon another 2 tablespoons of yogurt over the berry layer, again spreading it gently into an even surface. This creates a distinct visual separation between the fruit and the next layer of granola, contributing to the beautiful stacked appearance of the parfait.
- 6
Sprinkle another 1 tablespoon of granola over this second yogurt layer, ensuring it's evenly distributed. This continues to build the textural contrast and flavor profile of your parfait, making each spoonful a delightful combination of creamy, crunchy, and fruity.
- 7
Add another 1 tablespoon of mixed berries on top of the second granola layer. Again, aim for an even spread to maximize the visual appeal and ensure a burst of fruitiness in each bite. This is where the parfaits really start to take on their signature stacked look.
- 8
For the final layer, spoon the remaining yogurt into the glass, aiming to fill the glass to your desired level. You can create a smooth top or leave a slight swirl for visual interest. Ensure the yogurt covers the previous layer completely, creating a clean canvas for the final garnishes.
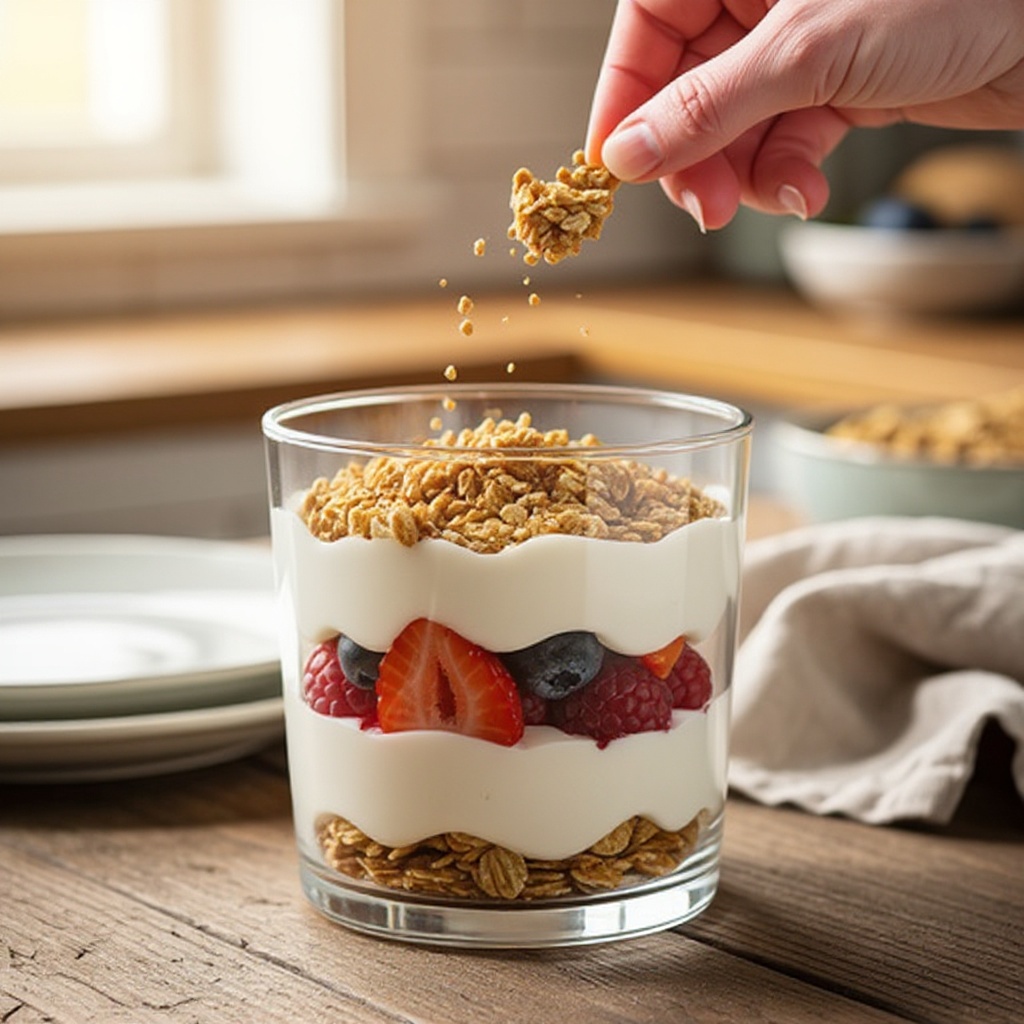
- 9
Finish with a final, generous sprinkle of granola on top of the last yogurt layer. This provides a satisfying crunch to the very top of the parfait and adds a beautiful textural element. Don't be afraid to let some of the granola spill slightly over the edges for a more rustic, appealing look.
- 10
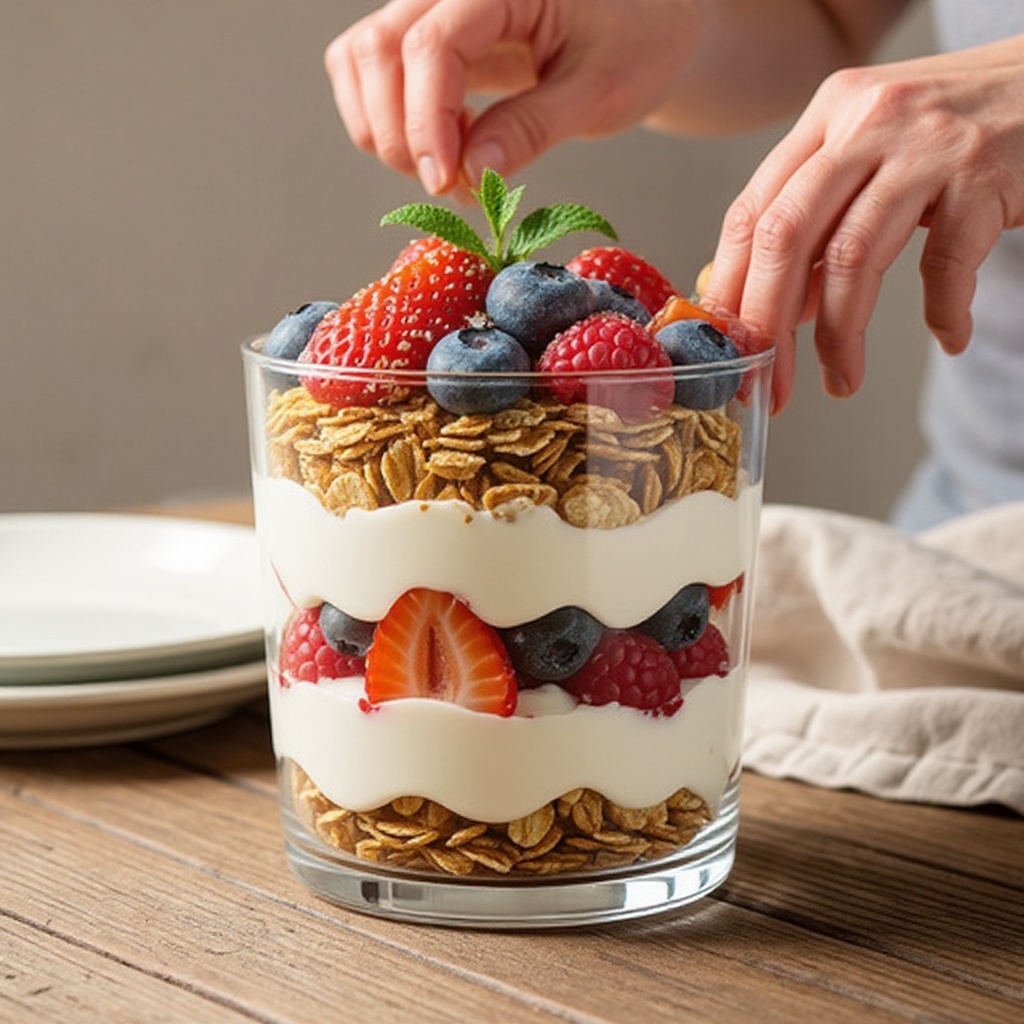
Garnish your parfait with a few extra berries on top. This final touch not only enhances the visual appeal but also signals the delicious fruit flavors waiting within. You can arrange them artfully or simply scatter them for a more casual presentation.
- 11
If you are using multiple glasses, repeat steps 2 through 10 for each glass, ensuring consistent layering and ingredient distribution for visually appealing and equally delicious parfaits.
- 12
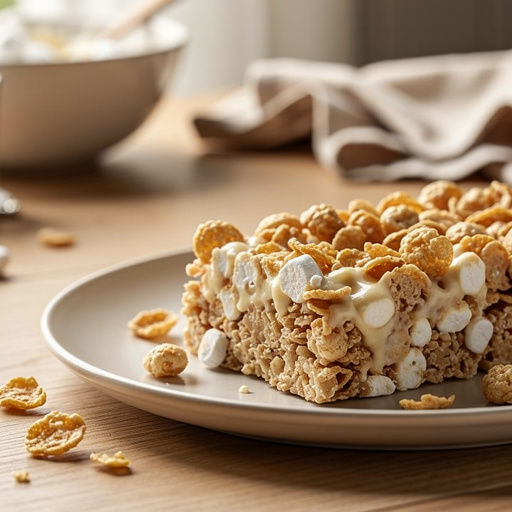
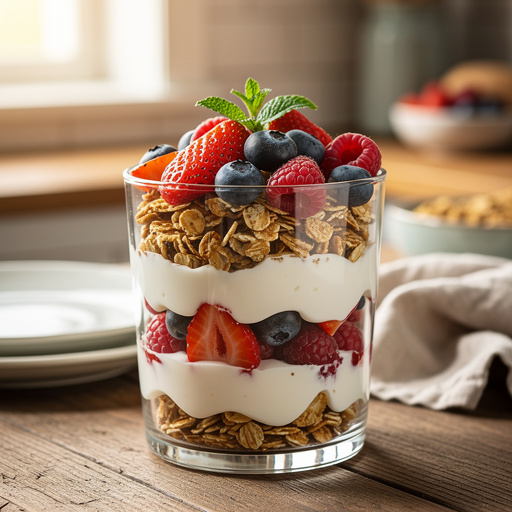
Once assembled, admire your beautiful no-bake yogurt parfait stacks! They are now ready to be enjoyed immediately, offering a refreshing and satisfying treat that looks as good as it tastes. The clear glasses showcase the distinct layers, making them a delightful centerpiece.
Tips & Troubleshooting
- 1If your Greek yogurt is particularly thick and difficult to spread, you can easily adjust its consistency. Stir in a teaspoon of milk (dairy or non-dairy) or a touch of honey or maple syrup until it reaches a more pliable, spreadable texture. This will make layering much smoother and prevent tearing the yogurt layers.
- 2Don't limit yourself to just berries! Experiment with a wide variety of fruits to create different flavor profiles and color combinations. Sliced bananas, diced peaches, chunks of mango, fresh kiwi slices, or even a spoonful of fruit compote can add exciting new dimensions to your parfaits.
- 3For an added layer of texture and nutritional boost, consider incorporating chopped nuts or seeds into your parfaits. Almonds, walnuts, pecans, pumpkin seeds, or sunflower seeds can be sprinkled between the yogurt and fruit layers, or even mixed into the granola for an extra crunch.
- 4To elevate your parfait from a simple snack to a more decadent dessert, consider drizzling a little honey, maple syrup, or even a light chocolate sauce between the layers or over the top. This adds a touch of sweetness and a richer flavor profile that is sure to impress.
- 5While these parfaits are best enjoyed immediately to maintain the crispness of the granola and the freshness of the fruit, they can be stored in the refrigerator for up to a few hours. Cover them tightly with plastic wrap or lids to prevent them from drying out. Be aware that the granola will soften over time.
- 6For a fun and engaging activity with children, set up a 'parfait bar' with various fruits, granolas, and yogurts. Let each child assemble their own parfait, choosing their favorite combinations. This empowers them to make healthy choices and enjoy the process of creating their own delicious treat.
- 7Consider the type of granola you use. A crunchy, hearty granola will provide a more substantial texture contrast to the creamy yogurt and soft fruit. If you prefer a lighter crunch, opt for a more delicate granola or even toasted oats.
- 8Presentation matters! Using clear glasses or jars allows the beautiful layers to be visible, making the parfaits more appealing. You can also garnish with a sprig of mint or a dusting of cinnamon for an extra touch of elegance.
Related Activities You Might Enjoy
Frequently Asked Questions
What are the easiest no-bake desserts for kids?
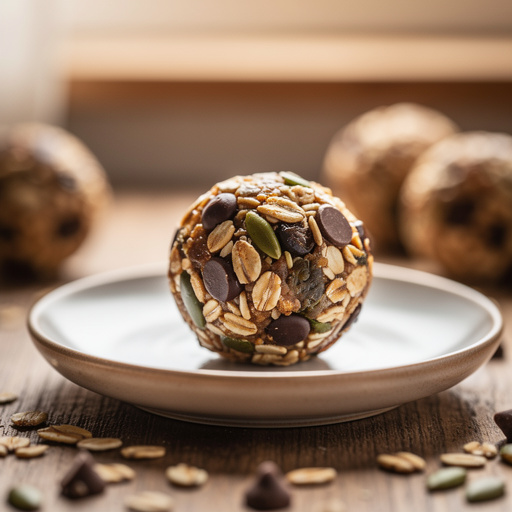
The world of no-bake desserts offers a treasure trove of simple, fun, and delicious options perfect for little hands to help create. Yogurt parfaits, like the ones we're making, are a fantastic starting point, requiring only layering and minimal supervision. Fruit skewers are another excellent choice, allowing kids to thread colorful fruits onto skewers – a great way to practice fine motor skills. No-bake cookies, often made with ingredients like oats, peanut butter, and cocoa powder, are usually mixed and then chilled or rolled into balls. Chocolate-dipped fruit, such as strawberries or banana slices dipped in melted chocolate and then chilled, is always a hit. These desserts typically involve few ingredients, straightforward steps, and minimal mess, making them ideal for engaging children in the kitchen.
Can I make no-bake desserts ahead of time?
The ability to make no-bake desserts ahead of time largely depends on their ingredients and intended texture. Desserts that are primarily composed of ingredients that hold up well, such as energy balls, no-bake cookie dough bars, or layered pudding desserts, can often be prepared a day or two in advance and stored in the refrigerator. However, for parfaits, layered trifles, or anything featuring fresh fruit or crunchy elements like granola, it's best to assemble them closer to serving time. The moisture from the fruit and yogurt can cause granola to become soggy, and fresh fruits can start to break down. If you must prepare them in advance, consider storing the components separately and assembling just before serving to maintain optimal texture and freshness.
What ingredients are needed for a simple no-bake dessert?
The beauty of simple no-bake desserts lies in their versatility and the common pantry staples they often utilize. At their core, many rely on a creamy base, such as yogurt, cream cheese, whipped cream, or pudding. These are often paired with a crunchy element like granola, crushed cookies, or oats, and a sweet component, which can be fresh fruit, dried fruit, honey, maple syrup, or a touch of sugar. Chocolate in various forms – chips, melted bars, or cocoa powder – is also a frequent player. Other common ingredients include peanut butter, nuts, seeds, and sometimes even ingredients like condensed milk for richer treats. The combinations are nearly endless, allowing for quick and easy creations with minimal fuss.
Are no-bake desserts healthy?
No-bake desserts can absolutely be healthy, but it truly depends on the ingredients you choose. By prioritizing whole foods and mindful additions, you can create nutritious and satisfying treats. Opting for Greek yogurt as a base, for instance, provides protein and probiotics. Fresh fruits are packed with vitamins, minerals, and fiber. Whole grain granola, nuts, and seeds offer healthy fats, fiber, and protein. When it comes to sweetness, natural options like honey, maple syrup, or fruit purees are generally healthier than refined sugars. Conversely, if a no-bake dessert relies heavily on refined sugars, processed cookies, or excessive amounts of butter and cream, it can be less healthy. The key is to be conscious of your ingredient choices and aim for balance.
What are some creative variations for yogurt parfaits?
The humble yogurt parfait is a blank canvas for culinary creativity! Beyond the classic berry and granola combination, you can explore a world of flavors and textures. Consider a tropical twist with mango, pineapple, and shredded coconut, perhaps with a sprinkle of macadamia nuts. For a chocolate lover's dream, layer chocolate yogurt with crushed chocolate cookies and a dollop of whipped cream. A 'key lime pie' parfait could feature lime-infused yogurt, graham cracker crumbs, and a swirl of whipped cream. You can also incorporate different textures by adding chia seeds, a drizzle of nut butter, or even a spoonful of fruit compote. Don't forget seasonal fruits – think apple and cinnamon in the fall or peach and ginger in the summer.
How can I make my yogurt parfaits visually appealing?
Making your yogurt parfaits visually appealing is all about showcasing the beautiful layers and adding thoughtful garnishes. The most crucial element is using clear glasses or jars so the distinct strata of yogurt, fruit, and granola are visible. When layering, aim for relatively even amounts of each ingredient and try to create clean lines between them. Don't overfill the glass, as this can make layering messy. For garnishes, a few strategically placed fresh berries on top always look lovely. A sprig of fresh mint can add a pop of green and an aromatic touch. A light dusting of cinnamon or cocoa powder can also enhance the visual appeal. If you're feeling extra fancy, a small drizzle of honey or a swirl of whipped cream can elevate the presentation significantly.
What Next?
These delightful yogurt parfait stacks are a testament to how simple ingredients can create something truly special. Feel free to get creative with your layers – consider adding a swirl of nut butter, a sprinkle of chia seeds, or even a few dark chocolate chips for an extra touch of indulgence. For a more elaborate presentation, serve them in stemmed glasses or mason jars and tie a ribbon around them. While best enjoyed fresh, leftovers can be covered tightly and refrigerated for a few hours, though the granola may lose some of its crunch.
Free: 10 Paper Crafts Anyone Can Make in 5 Minutes
Get our beginner guide + new craft ideas weekly.
No spam. Unsubscribe anytime.
Did you complete this activity?
Related